You want to know whether your blog is doing well, right?
Whether those posts you work so hard on are attracting traffic, and where that traffic is actually coming from?
Whether your last marketing campaign was a smashing success or an unfortunate bomb?
Because if you don’t know whether what you’re doing is working, you’re basically running around blind. And that means you could be wasting valuable time and energy on stuff that just plain ain’t moving the needle.
There’s great news, though …
If you installed Google Analytics when you started your blog, you’ll never have to wonder how your blog is doing again.
Why Every Blogger Needs Google Analytics
Google Analytics is what replaces “I think this works” with “I know this works.”
It tells you where your visitors come from, which posts they just can’t get enough of, and, well … almost anything else you can think of.
Seriously, Google Analytics is like your own personal spy agency for your website.
But here’s the thing:
Google Analytics can only do those things if you can actually get it installed on your WordPress blog.
And that’s why I’m here to lend a helping hand.
How to Make Google Analytics Friends with WordPress
Installing Google Analytics is actually quite easy, even if you’re not a tech-head. Honestly, you can have it installed in five minutes or less.
Basically, there are two distinct parts to this process:
Part 1: You need to create a Google Analytics account and add your website to Google Analytics. All of this happens inside the Google Analytics interface. You won’t lay a finger on your site.
Part 2: You need to add the tracking code that Google Analytics gives you to your WordPress site. This is the part that trips a ton of beginners up. No worries, though. We’ll get through it together.
I’ll give you detailed step-by-step instructions for each of these processes below.
Ready? Let’s go …
Part 1: Creating Your Google Analytics Account
Alrighty, the first step in your journey to the goodness of Google Analytics is to actually create your Google Analytics account.
For this, I’m going to assume that you already have a regular ‘ole Google account because, well … you’re on the Internet. If not, you can always create one right now.
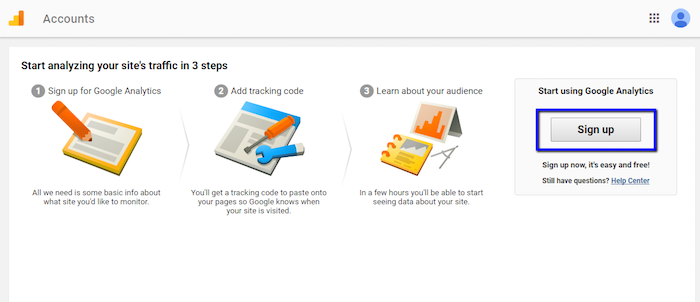
To get started with Google Analytics, head here. If you’re not already logged in to your Google account, Google will prompt you to sign in. If you are logged in, you’ll see a signup wizard right away.
Go ahead and click that big Sign up button on the right:
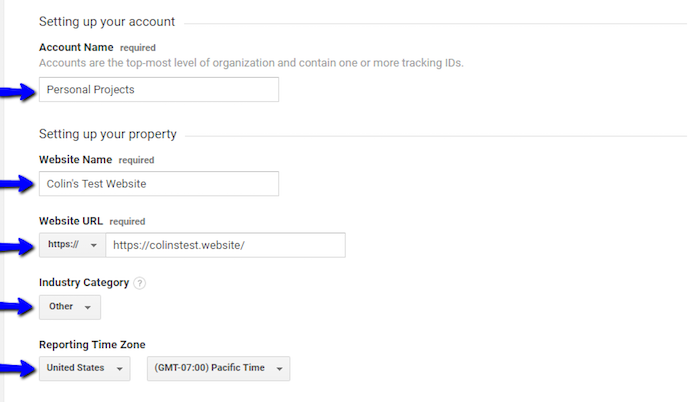
Next up, you’ll need to add details about your website. Here’s what you’ll need to enter in the Setting up your account section:
- Account Name — This is just for internal organization. You can enter whatever you want. In my analytics account, I put “Personal Projects” in this box.
- Website Name — Again, this is for internal organization. Just enter the name of your website in plain words. For example, “Smart Blogger.”
- Website URL — Paste in your website’s URL. The only tricky thing here is to make sure that you choose either http:// or https:// from the drop-down, depending on whether or not you’ve enabled SSL. Just look at the beginning of your URL to figure out which applies to your site.
- Industry Category — This is optional. Google uses it to help provide tailored reports for your industry. If you don’t see a category that perfectly fits your website, feel free to leave it blank. It’s really not worth stressing over.
- Reporting Time Zone — Most of the time, you’ll want to set this to your own time zone. But if your target audience has a radically different time zone from your own, it can be helpful to choose the time zone where most of your audience lives so that your analytics sync with their daily life.
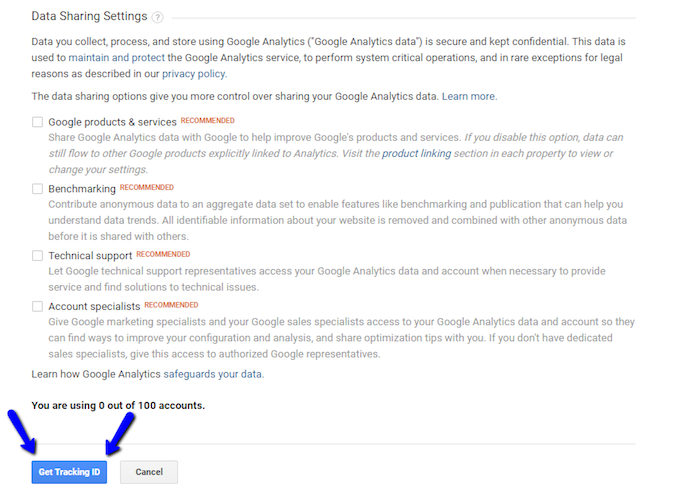
Once you’ve knocked that out, scroll down to the Data Sharing Settings options. There are no right or wrong answers here — it just depends on your penchant for privacy.
I’m a grouch on the topic, so I always uncheck every single box. But you can feel free to check and/or uncheck according to your own preferences. And once you’re done deciding how much data to fork over to Google, scroll to the bottom and click that nice blue Get Tracking ID button:
You’re almost there, but first, Google wants you to read their lengthy Terms of Service Agreement which, let’s be honest, you probably won’t read (I know I didn’t!).
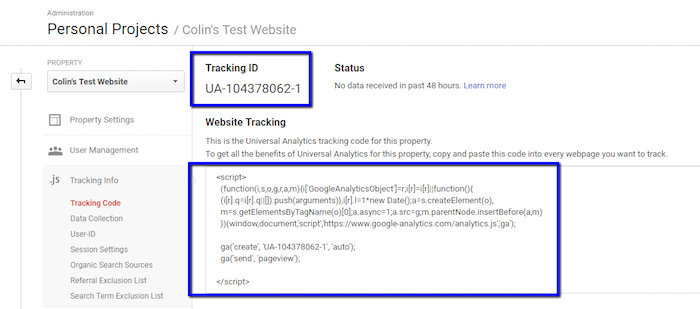
Once you accept their terms of service, Google will dump you straight into the Google Analytics interface:
This part of the interface is where you’ll find your Tracking Code and Tracking ID.
Keep this tab handy because you’ll need this information in the next part.
Part 2: How to Add the Google Analytics Tracking Code to WordPress
You have a couple of ways to add the Google Analytics tracking code to your WordPress site, each with its own pros and cons.
You can choose to use the Insert Headers and Footers plugin, which is the quickest method and does a clean install of the Google Analytics tracking code without any added bells and whistles. This plugin also isn’t limited to Google Analytics, and if you ever need to add more code to your site’s header or footer sections, you can use this plugin for that as well.
Or you can choose the Google Analytics Dashboard for WP plugin (GADWP), which helps you both install the tracking code and view analytics reports inside your WordPress dashboard.
The best choice comes down to whether or not you want the ability to view reports inside your WordPress dashboard.
And not everybody agrees on this.
Some find it useful to get a basic sense of your stats without having to leave your WordPress dashboard.
Others feel the reports you get inside your dashboard are too limited, and you end up using the external Google Analytics dashboard anyway, so the widget only clutters things up. On top of this, the Insert Headers and Footers plugin may save you from having to install further plugins down the line, and the fewer plugins you have, the faster your site will be.
If you have any doubts or are struggling to make a decision, install a plugin that gives you reports inside your dashboard and see if you find it useful. You can always switch later without too much fuss. Plus, you can still use the stand-alone Google Analytics dashboard, too.
Make your choice below:
How to Add the Tracking Code with Insert Headers and Footers
Okay, so you decided you don’t need to view analytics inside your dashboard, which means you can do a clean install with the Insert Headers and Footers plugin.
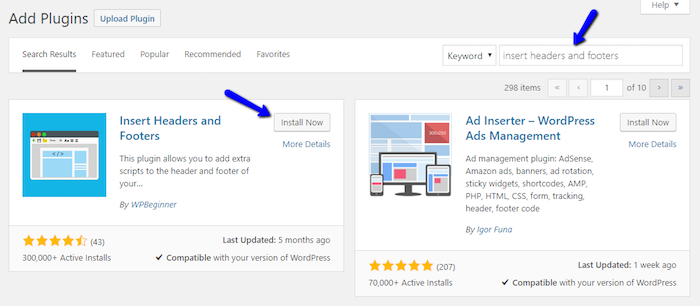
Go into your WordPress dashboard and click Plugins → Add New. Then search for Insert Headers and Footers.
Once you’ve found the plugin, click the Install Now button and it will change to Activate. Click Activate and you’re good to go.
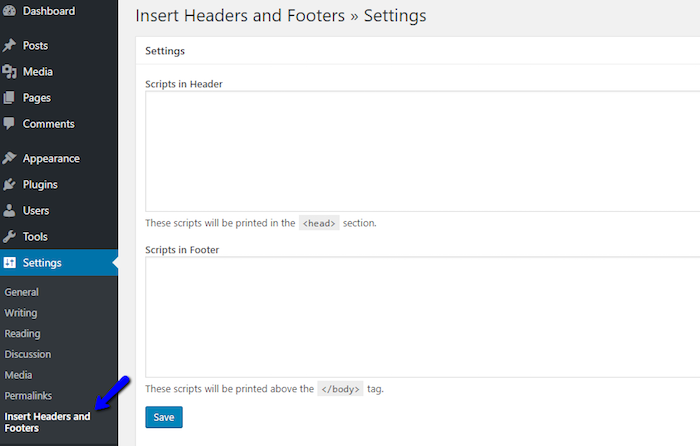
Once you’ve activated the plugin, go to Settings → Insert Headers and Footers in your WordPress dashboard:
Remember when I told you you to keep your tracking code handy? Here’s where you’re going to use it.
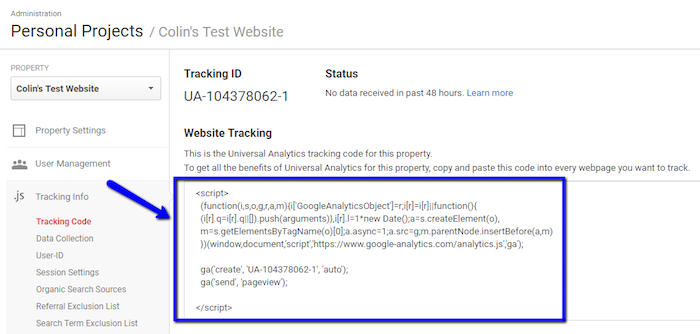
Head back to the Google Analytics interface and copy the whole script in the Website Tracking box:
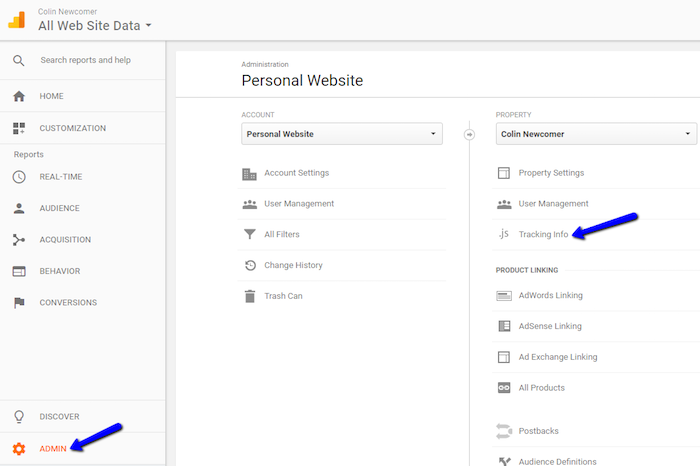
If you accidentally closed the tab or skipped the first section, you can always find your Google Analytics tracking code by going to Admin in your Google Analytics dashboard sidebar and clicking Tracking Info under the Property column:
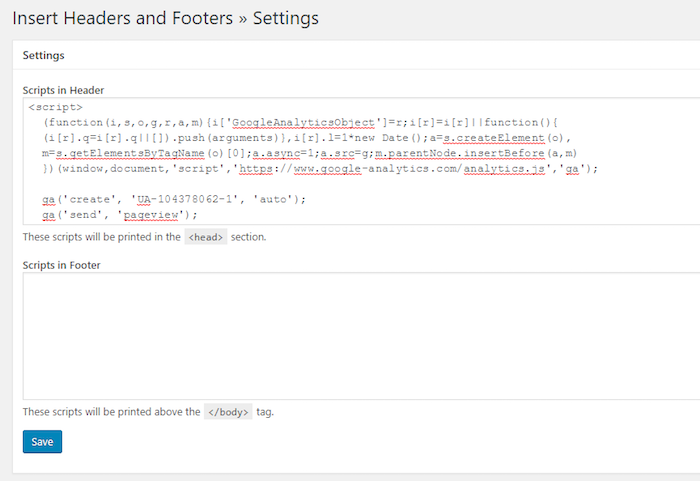
Okay, you have your tracking code. Now copy it, go back to your WordPress dashboard and paste it into Scripts in Header:
Then just save your changes and … presto, you’re done!
That wasn’t too painful, right?
Keep reading for a quick and dirty guide to get up and running with the Google Analytics dashboard.
How to Add the Tracking Code with Google Analytics Dashboard for WP
Okay, so you decided you do wish to view reports inside your WordPress dashboard. That means I’ll help you install Google Analytics Dashboard for WP.
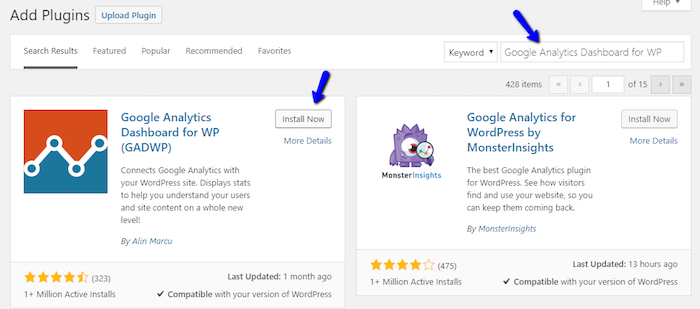
And it’s easy. You can install it right from your WordPress dashboard by going to Plugins → Add New and searching for Google Analytics Dashboard for WP.
Once you’ve found the plugin, click Install and then click Activate.
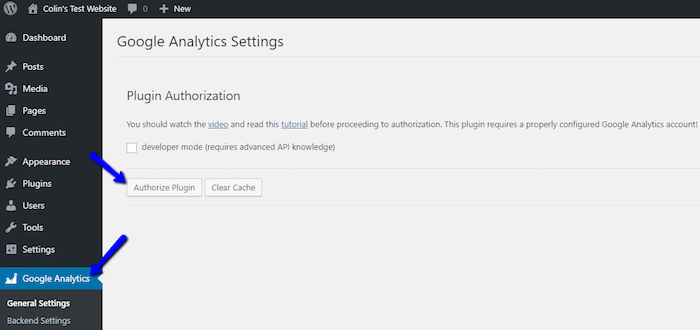
Now head to the new Google Analytics tab in your WordPress dashboard and click the Authorize Plugin button:
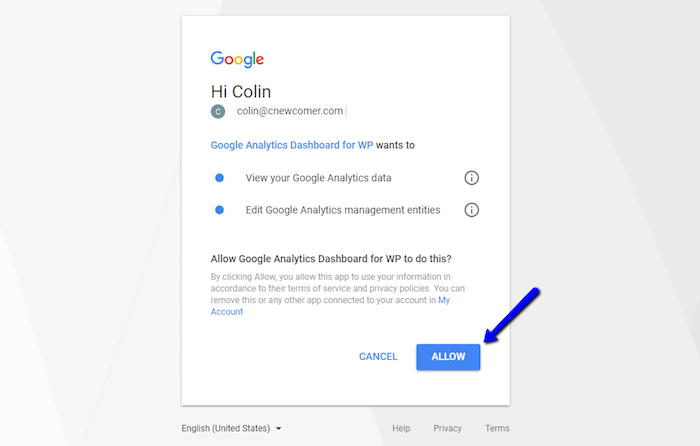
In order for the plugin to show you reports inside your WordPress dashboard, you need to give it permission to access your Google Analytics data. That’s what this authorization process does.
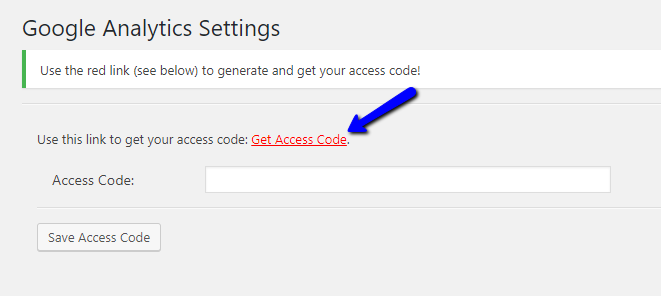
Once you click the Authorize Plugin button, the plugin will prompt you to enter your Access Code.
To get your access code, click the red Get Access Code link:
Then you need to Allow the plugin access to your Google Analytics account:
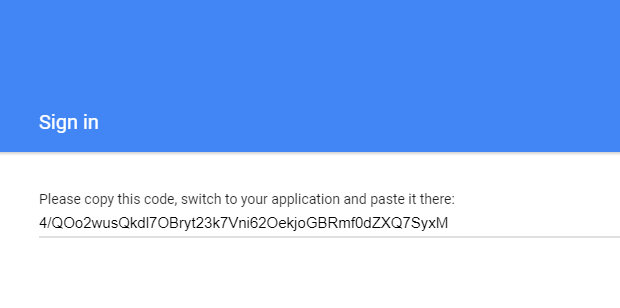
Once you click the Allow button, Google Analytics will give you your access code:
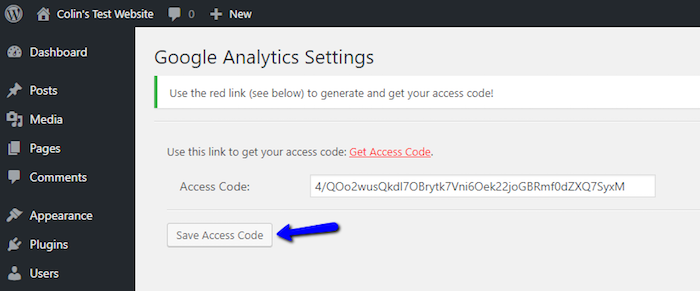
Copy this code, head back to your WordPress dashboard, and paste the code into the Access Code box. Then, click Save Access Code:
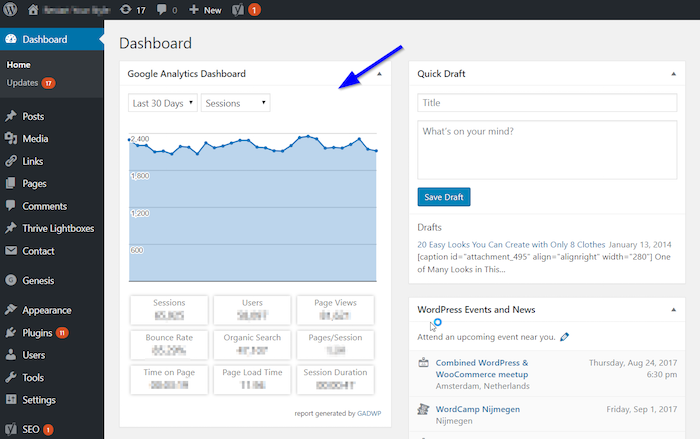
And you’re done! You’ll now see an Analytics widget on your WordPress dashboard homepage. (Yours might be in a different spot than pictured below, but you can move it as you wish.)
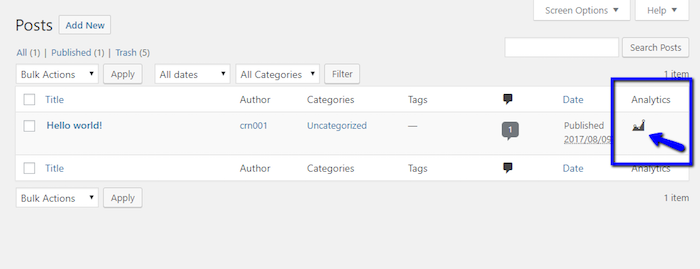
You’ll also see a new Analytics column for all of your posts and pages.
To access analytics for specific posts, just click on the Chart icon in that column:
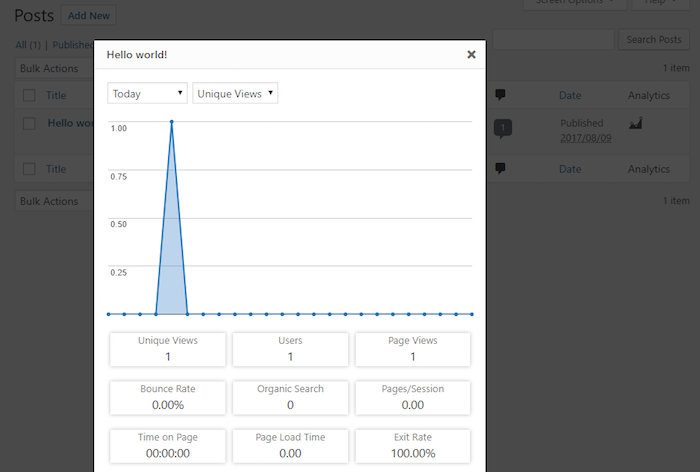
Once you click the Chart button, a lightbox window will pop up with stats for that specific post:
Cool, huh?
Now you might be confused by some of the terms you see — “what the heck is Bounce Rate?” — but no worries, I’ll explain some of the basics below.
Finished? Then Check Out This Google Analytics Quick-Start Guide
Okay, so you’ve installed Google Analytics. Now what?
When you head to your Google Analytics dashboard, you might feel confused by all the different numbers and reports.
Yes, there’s a ton of data in Google Analytics, which can feel overwhelming if you’re new to it and you don’t know what everything means.
To assist with that, I want to introduce you to some basic Google Analytics reports and terminology that can help you understand what’s happening on your site. I’m not promising to make you a Google Analytics expert (there’s a whole academy for that!). But I can get you started on the right path.
Google Analytics Terminology 101
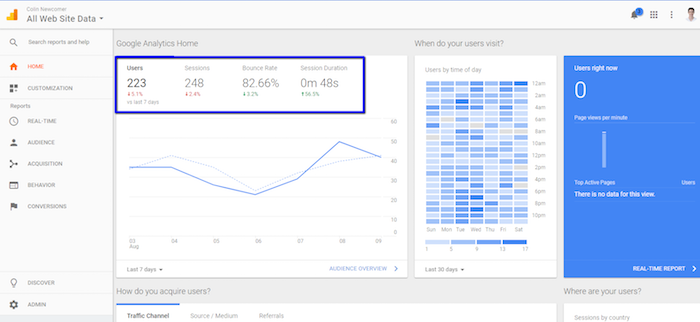
When you log in to your Google Analytics dashboard, Google is going to dump a bunch of terminology on you:
Thanks, Google … but what does all that even mean?
Here’s your cheat sheet:
- Users — The number of unique visitors to your site for the specified time period.
- Sessions — The number of visits to your site. One User can have multiple Sessions. For that reason, the number of sessions will almost always be higher than the number of Users (and can never be lower).
- Bounce Rate — The number of people who leave your site without completing any actions. For example, if a visitor immediately clicks the “back” button, that counts as a bounce. Because of how Google Analytics calculates Bounce Rate, a user might still count as a bounce even if they only click the “back” button after spending ten minutes reading your post.
- Session Duration — How long, on average, each visit to your site lasts. From the screenshot above, you can see that the average visitor spends 48 seconds on my site. Don’t take this number as gospel, though. It can be a bit misleading.
3 Basic but Helpful Google Analytics Reports for Beginners
Google Analytics is mind-bendingly deep in functionality. And one of the joys of Google Analytics is finding creative new ways to structure reports and approach your data from different angles.
But if you’re just signing in to Google Analytics for the first time, that doesn’t mean anything to you.
So we’re not getting into all of them here, but let me share some basic reports with you to get your feet wet:
1. Checking Your Visitors’ Demographics
Knowing your visitors’ demographics can provide incredible insight into your audience. Where they’re from, what age they are, what they’re using to access your website. You won’t believe how useful this can be.
For instance, on one of my sites, 80% of my visitors use their computers, while on another, over 80% visit from their smartphones. That’s a massive difference. And you’d better believe I put a higher emphasis on mobile-friendly content on the second site.
Learning more about your audience’s demographics will help you find little idiosyncrasies like that for your site.
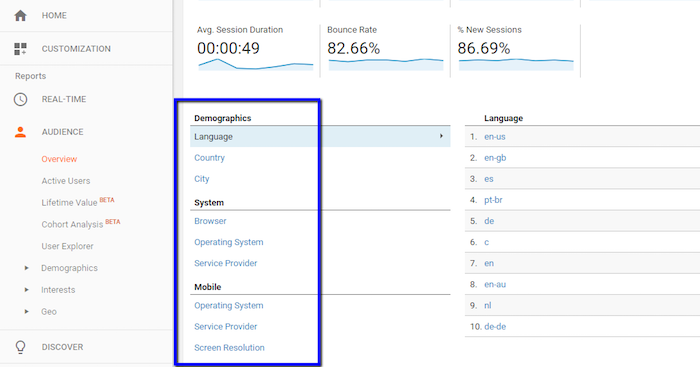
To do it, head to Audience → Overview:
You can click on any of the links under the Demographics column to see a more detailed report.
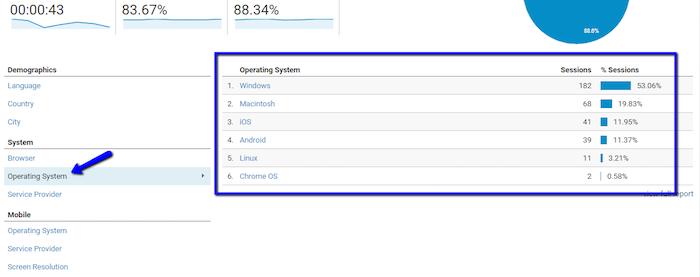
For example, if you click on the Operating System option under System, Google Analytics gives you a breakdown of your visitors’ operating systems:
2. Finding Your Most Popular Content
Do you actually know which posts get the most traffic on your blog?
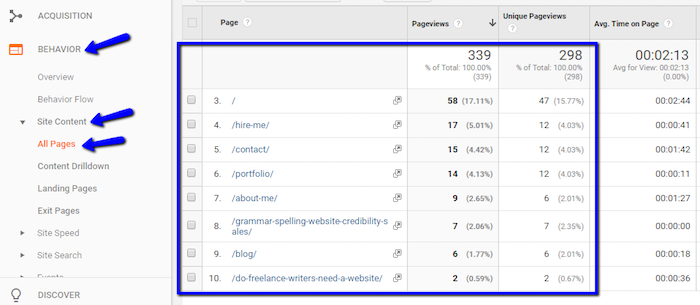
Don’t guess. Go to Behavior → Site Content → All Pages and look at the real data:
You’ll see all of your most popular content, as well as additional metrics for each piece of content.
3. Discovering How People Find Your Site
Figuring out which content sources drive the most traffic to your site helps you focus your efforts on the channels which deliver the best bang for your buck.
Better yet, you might find some sites sending traffic to you that you never knew existed! Maybe you can reach out to them and form a stronger partnership.
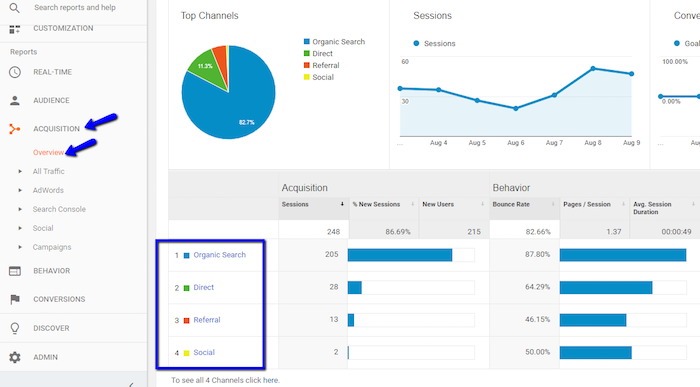
For all those traffic insights (and more!), head to Acquisition → Overview:
You’ll see a breakdown of the different channels that drive traffic to your site:
- Organic search — Traffic that finds your site through a search engine.
- Direct — Traffic that types your URL directly into their browser’s address bar.
- Referral — Traffic that finds your site through a link on another website.
- Social — Traffic that finds your site through social media.
To see more information about a specific channel, all you need to do is click on it.
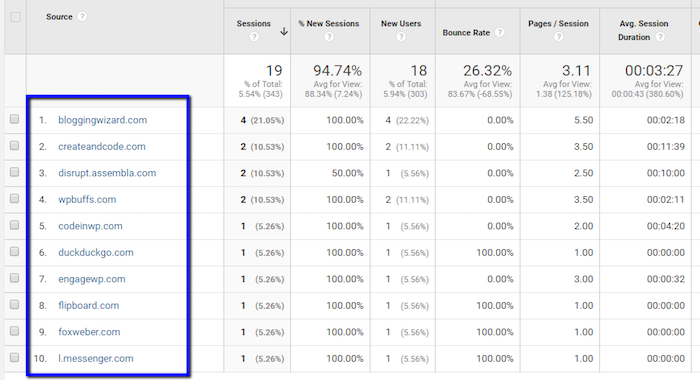
For example, if you click on the Referral option, Google Analytics will show you a report of all the websites that drove traffic to your site for the specified time period:
Let’s say you published a guest post on an A-list blog, and you want to see exactly how much traffic it sent you. This report will tell you!
And these reports are just the tip of the iceberg. If you want to know more, check out Casey Kluver’s guide that dives much deeper into various Google Analytics reports.
Congrats! Your Days of Guessing Are Over
You’ve just learned how to stop guessing and start knowing. Gone are the days of wondering what’s making your blog and its visitors tick.
Now you’ll have all the relevant data right at your fingertips, ready to pull up at a moment’s notice.
You’ll know which marketing strategies and content work the best, as well as which could use a little rethinking.
That means you can work smarter and build a better, more data-driven blog.
And that, friends, is pretty dang awesome!



WordPress is a must have for anyone working anywhere online looking to take blogging and side hustles seriously because WordPress is operable by anyone looking to transform the side hustle and graduate into the big leagues of being a full-time blogger/content marketer/millionaire affiliate marketer.
Please cast your vote today for the Delaware blogger. See details on the page for more information. Thanks! 🙂
Excellent Post! Love it!!! I had google analytics for a while but still didnt know a lot of stuff!! Thanks
Hey Paula,
Glad it helped! I’ve been using Google Analytics for years and I still discover new things, so it’s definitely a constant journey.
Colin,
Were you confused feeling like I am when it came to Google Analytics? I know somewhat how to use it but still doesn’t understand all of it’s functions after all these years. How long did it take you to master Google Analytics?
Thanks Colin.You presented a boring tutorial in a very interesting way.
I use Google analytics with monsterinsights plugin.Its pretty easy to set up and use.
Hi Colin,
Many many thanks for sharing such a wonderful post. Though the steps are quite simple, many of us still don’t know how to connect a website to Google Analytics.
I hope that this will help all the beginners out there when it comes to starting a blog.
Regards,
SM
Sure thing! It’s definitely simple, but I think it’s something a lot of beginners struggle with still
Thanks for sharing a great article. Although my analytics information is a little depressing right now LOL – knowing this general info is very helpful and will allow me to learn more about driving traffic as I learn from where it is driven. I appreciate the informative and easy-to-understand article!
Don’t worry about low stats – that just makes it more fun to watch the numbers grow!
Wow! Thank you so much for this roadmap to Google Analytics!
I’m just setting up a site and this is step-by-step plan will make it soooo easy for me to add Google Analytics.
Much appreciated,
Martha
Hey Martha,
Glad it helped! The best part is, once you get it set up you’re good to go forever.
Colin, Thanks. This is the best idea to add Google Analytics to WordPress in few minutes.
Yup! Definitely a good idea.
Colin, This post is very helpful to add Google analytics to Wordpress. I am going to share this post on my facebook. Thanks.
Thanks for sharing, Raj!
I appreciate the information. Thanks!
Before adding a plugin, check whether your theme already offers a way to add your GA code, many do. Also, the code may be manually added to a theme’s functions.php file.
Hey Hank,
If your theme has a dedicated option that’s a solid choice, but people need to be a little careful with functions.php because that requires a child theme to work safely.
You’re right on point with that, Hank!
Hey Colin,
Thanks for the tips you’ve shared. I am facing some problem from the past couple of days in my Google Analytics account. I am using Vantage theme on my WordPress site and when I added the analytics tracking code inside the header.php file on my WordPress site, it worked perfectly fine for a day and after that, I received a notification from Google that my Google Analytics tracking code is missing from my website. I added the code again, it worked for a day and again I got the same message later. Do you have any idea why is this happening? Thanks in advance.
If you’re going to manually add code to theme files, they can be overwritten during updates unless you create a child theme.
Hey Ajay,
I’m guessing Hank’s right and that you didn’t use a child theme to add the code, so theme updates are overwriting your code. Could be something else – but that would be my first instinct.
If you use the Insert Headers and Footers plugin from my guide, it should fix the issue.
Thank you, Hank and Colin, I really appreciate your help. My problem is fixed now. Please keep sharing.
Colin, thank you! I never had this installed correctly and never knew how to do it. I feel like I’m finally “arriving”. 🙂 #newblogger My reports all show zeros so it’ll be interesting to see numbers start appearing. Thank you for this simple tutorial. I’m grateful!
Hey Lisa,
I’m glad it helped. Have fun watching those numbers start ticking!
Amy,
Don’t sweat that your Google Analytics info doesn’t look good for now. That’s just for now. Keep doing the transformation work at full strength as an entrepreneur striving for excellence to get organized. It’s trying times like what you’re going through now that makes or breaks you out of inspiration or desperation. Keep creating lots and lots of content, keep building and sustaining positive relationships with other bloggers and your target audience, and most importantly..hang in there. The sun is going to shine for you very soon. Keep on keeping on! 🙂
Excellent post, thanks for the extra tools. Been using Google Analytics on many sites, thanks for shifting my focus back to plugins. Love these tools, it makes blogging a lot more effective, not to mention Ranking.
Hey Deon,
Glad you found it helpful!
This is awesome, Colin. You can include the usage and cool data by exploring the gallery options too. A lot of treasure presents when we explore the data via the gallery.
And in the next post, you can include how to install Google analytics via google tag manager 🙂
Cheers
Yeah there’s definitely a ton more to learn (if you like looking at analytics). Tag Manager and Events are something I’ve been exploring a lot lately. Very helpful, though not especially beginner-friendly.
Hey Colin, great post with very easy instructions to follow. Thank you! I got it all installed but it shows “no data”? How long does it take to pull the data? Thanks!
Hey Alana,
Assuming that your site is receiving traffic, you should start to see stats show up almost immediately. You can go to the “real-time” tab to see a real-time feed. The other reports aren’t quite real-time but pretty close.
Hello,
You can also add google analytics WordPress plugin in your WordPress Website or Blog. Please also mention or include Google Analytics WordPress Plugin in your post.
Hey, the second method uses a Google Analytics WordPress plugin – so give that a look if you prefer a dedicated plugin
Hi Colin,
Great post. It seems to be effortless how you are describing to add google analytics to Wordpress.
Many new things are found in this article about Google analytics which is interesting.
Thank you for sharing such a valuable article!!
Hey Ashutosh,
Glad you found it helpful!
Thanks for this informative post.
I am new to blogging and learning new things from SmartBlogger. I am using google analytics with “Add header and footer” plugin. but it’s great to know that using “Google Analytics Dashboard for WP” i can get the data in WordPress dashboard, i am definetly going to give it a try. Thanks again.
NIshant,
You’re well on your way to blogging millions if you stay on the path. Being an aspiring blogger is tons of work creating content from scratch. If you do the transformation work and stay consistent, you’ll make so much money from your blog that you’ll never have to work a day job again. Stay faithful. 🙂
I’m glad, Nishant! I think the in-dashboard stats option is great for people who just want to be able to easily keep track of some basic metrics about their site.
Google analytics is the best web service that keeps track of website visits.
The awesome thing about the tool is it’s ability to track user
behaviors; and source of traffic (where website visitors are coming from).
It also has the use of
informing you how many readers are present on your site at a particular time.
I love that tool.
i think we can also use wp google analytics plugin that is also helpful right?
Magnificent instructional exercise. I have been endeavoring to utilize Google Analytics and this post of yours was extremely useful.
Hi Collins,
I have been looking for this, but no blog posted about except this wonderful Blog Hence, Thanks For This.
Cheers..
Abdul Malik…
Great there are tools too which helps to connect WordPress with Google Analytics. Can you say some other tools to connect with the Google Analytics and WordPress site.
Hello, Colin!
There are indeed so much analytical software we can integrate with our WordPress blogs..
But…
Google Analytics is the top most recommended and useful software to choose out of the list!
I am the biggest fan of it and surely recommend everyone to install it as soon they’re finished installing WordPress.
Thank you for this comprehensive guide! You made it too easy for the people new to it. 🙂
~ Adeel
Olaniyi,
Social media provides “positive spontaneous opportunities” for businesses of all sizes across the world to gain online visibility free of charge and respectively get new customers. Looking to learn more about “using social media to drive sales?”
Collins,
Your explanation was very much clear.
But i have a question do google analytics track all backlinks, please let me know.
Hi Mark,
No it doesn’t do that directly, unfortunately. You’d need another tool for that.
Can you please tell me the name of that tool which track all backlinks of Google analytics especially forums
There are a bunch – look at tools like Ahrefs, Moz Explorer, SerpStat, etc.
Hi Colin, thanks for sharing such excellent info!
Google Analytics is a very handy tool and has been very helpful to me ,It is one of the first tool i install after every WordPress Installation .
Hello Colin Newcomer,
I always use Google Analytics Dashboard for WP (GADWP) plugin to setup Google Analytic.
Can you please tell me how Can i track external link click and how to adjust bounce rate using tag manager.
Thanks in advance.
Hey Subhashree,
If you go to the “Tracking” code menu and then the “Events Tracking” tab you can toggle them on or off. That menu is where most of the advanced features are
Hi Collin, this article is very rich and unique. I have been using Google Analytics from day one even when I knew not the use from the beginning. Not until I started making research and setting it up on my WordPress Blog wasn’t so easy.
But today with this your article many newbies will be able to start using Google Analytics to improve their blog performance within 5 minutes. Thanks a lot for adding to out knowledge.
Regards,
Awogor
Hi Colin,
The step by step procedure of getting Google Analytics will definitely help for the new comers in this field. Thanks
Google analytics is the best SEO tool , its show all reports of the about the projects, thank you for sharing the post, its so interesting and informative.
Great I really love this, This SEO tool is awesome that was amazing, thanks for sharing a beautiful knowledge with us.
Hi,
Good Information for a new blogger, Google Analytics is the best tool for a blogger.
Thanks for sharing this Step-by-Step guide.
Wow! This article Just taught me lots of important things.
I use Jetpack and WP Statistics for my analytics and they are given me two different results. I need to get my Google Analytics working so I can rely on one.
Thanks for the post
wow!! This is really super easy way to ad google analytics on wordpress. Thanks a lot for sharing this.
Thank you very much for sharing this interesting and very informative articles. It’s really a big help to your readers, especially for beginners. Everyone knows that Google analytics is the best SEO tool. You could monitor the real traffic of your blog.
So, once again thank you.
This line really stuck in my head:
“Google Analytics is what replaces “I think this works” with “I know this works.”
As a newbie blogger, I was never a fan of using google analytics for the simple reason that I thought that I would get discouraged seeing the little traffic as I am just starting out.
For that simple line that I just mentioned above, I am gonna start using google analytics.
Thanks for opening my eyes.
Every blogger should add Google analytic tool for blog success. We know our readers’ types, behavior, demands by the Analytic tool. I love this toll or Google gave boon for every blogger.
Your regular reader Shubham.
Great! Finally I’ve found a solution.
Adding google analytics on my blog was not easy for me but with this your well explained article, I would be able to do it so easily. Thank you so much! I love this!
This is very good and useful and constructive 😀 I’ll definitely use this for my business. Thank you Colin for sharing 😀
Great post on this Google Analytics, Colin. I used to use my hosting stats, but this post has shown me the usefulness of GA. Immediately after I read this post, I installed the GA stuff in my websites. And, the additional tips on using GA was a bonus 🙂
Our thanks, helped me a lot in adding Google Analytics to WordPress is really quite easy and simple to install.
I didn’t know this until reading your constructive article, Colin. Thanks a lot!
many websites that provide tracking services. but google analytic I think is more appropriate. I use google analytic and histats to find out the source of traffic for my blog
Here are my 5 steps to do:
1. Check your active theme’s header.php file to ensure it includes the wp_head hook.
2. Create a new file in your plugins folder.
3. Get your analytics tracking code from the Google analytics site.
4. Add some code including the tracking code to your plugin.
5. Activate the plugin.
Wow! Thank you so much for this roadmap to Google Analytics!