We’ve all been there — staring at a blank screen, desperate to craft the perfect professional email format, but the words just won’t flow.
Let’s remedy that, shall we?
In this post, we’ll break down the art of email formatting into 5 super simple, foolproof steps.
By the end, you’ll be writing emails like a pro.
Let’s dive right in.
5 Steps to Professional Email Success
In today’s digital world, crafting a professional email is more important than ever.
Effective email communication can enhance your professional image, build strong relationships, and open doors to new opportunities.
With our 5-step process, you’ll quickly learn the secrets to creating captivating emails that leave a lasting impression on your recipients.
So let’s dive into the five steps that’ll elevate your email game…
Step 1. Create Compelling Subject Lines

The subject line: it’s your email’s first impression, and boy, does it matter!
Think of it as the “headline” of your email message, designed to pique readers’ interest and making them want to read the content inside.
Get it right, and your recipient will eagerly click open your email, excited by the promise of valuable information or an irresistible offer.
Mess it up, and, well…you know what they say about first impressions.
Your email might end up in the dreaded void of unopened messages, never to be seen again.
So, to create a strong subject line, consider these tips:
Keep It Concise and to the Point
Ever noticed how easy it is to skim right past an email with a long, convoluted subject line?
To make sure your email doesn’t suffer the same fate, try to keep your subject lines short. In fact, MailChimp recommends up to 9 words and 60 characters.
This not only makes them easier to read but also ensures they’ll display properly on most devices.
For example, imagine you’re sending a meeting request to discuss a project’s timeline.
Instead of a subject line like:
“I’d like to schedule a meeting with you to discuss the timeline of our current project,”
Try:
“Meeting Request: Discussing Project X Timeline.”
Short, sweet, and to the point.
Create a Sense of Urgency
Nothing makes people take action like a little pressure, right?
So, when appropriate, inject some urgency into your subject line. This can be particularly helpful for marketing emails, but it can also apply to other situations.
Just don’t overuse it, or you risk desensitizing your readers.
Consider you’re working on a promotional email for a limited-time offer. Instead of:
“Our Exclusive Offer is Available Now”
Try:
“Last Chance: Exclusive Offer Ends Today!”
The clock is ticking, and your reader will feel the need to act fast.
Personalize the Subject Line
You know that warm, fuzzy feeling you get when someone addresses you by name?
It’s like they really see you, right?
Well, that’s precisely the feeling you want to evoke in your readers.
For instance, say you’re sending a customized fitness plan to a client named Sam. Compare these two examples:
- “Customized Fitness Plan”
- “Sam, Your Customized Fitness Plan Awaits”
The first makes you feel like you’re just another face in the crowd.
But the second shows you’re recognized and valued, so you’re more inclined to read on. Thus, significantly increasing open rates.
Step 2. Charm Readers with the Perfect Greeting

Once you’ve nailed the subject line, it’s time to charm your reader with a friendly and professional salutation.
This sets the tone for the rest of your email and helps establish rapport.
Use a Professional and Friendly Tone
No matter who you’re emailing, it’s essential to strike the right balance between professionalism and warmth.
A simple “Dear Jane,” can work wonders in this department.
Consider Your Relationship With the Recipient
But what if you’re writing to a close colleague or someone you’ve known for ages?
Well, you could opt for a touch of humor, but the safe bet is to opt for a more informal greeting, like:
“Hey Jane,”
Just remember that context is key, and what works for one recipient may not work for another.
Adapt Your Greeting for Cultural Sensitivity
When emailing recipients from different cultural backgrounds, it’s important to be aware of potential cultural differences.
Familiarize yourself with their customs and adapt your greeting accordingly. This not only shows respect but also helps create a positive connection from the start.
For example, if you have a German-speaking recipient, you could start your email with:
“Guten Tag”
Step 3. Keep Attention With an Engaging Email Body

Alright, you’ve set the stage with a killer subject line and greeting. Now it’s time to get down to business and deliver your message.
Here’s how to keep your content clear, concise, and engaging.
Use Short Paragraphs and Bullet Points
Ever opened an email and been greeted by a wall of text?
Yeah, it’s not pretty.
So, do your recipients a favor and break your content into bite-sized chunks. Take a look at this short snippet of a plain text email from our very own Jon Morrow:

Using short paragraphs, or bullet points, makes your email easier to read and digest.
Focus On One Main Idea Per Email
Remember that old saying, “too many cooks spoil the broth”?
Well, the same goes for ideas in an email.
To keep your email message clear and focused, stick to one main idea. In Jon’s email (above), he focused on taking the leap and chasing your dream.
Use Actionable Language
The last thing you want is for your email to leave recipients scratching their heads, wondering:
“So, what do they want me to do?”
To avoid that scenario, use clear, actionable language and include a call-to-action (CTA) that tells recipients precisely what you expect from them.
If you’re sending an email to a colleague or client, try:
“Please review the attached document and provide feedback by Friday.”
If you’re promoting a last-chance offer to your customers, try:
“Add to Cart – Only 3 Left in Stock”
Step 4. Seal the Deal with a Strong Close

You’re almost there! Now it’s time to wrap up your email with a strong close.
This is your chance to summarize your message, reiterate your CTA, and leave a lasting impression.
Summarize the Email and Reiterate the CTA
Before you sign off, take a moment to recap the main points of your email and remind recipients of your CTA.
This not only reinforces your message but also makes it easier for them to refer back to it later.
Let’s jump back to the previous plain text email example from Jon:
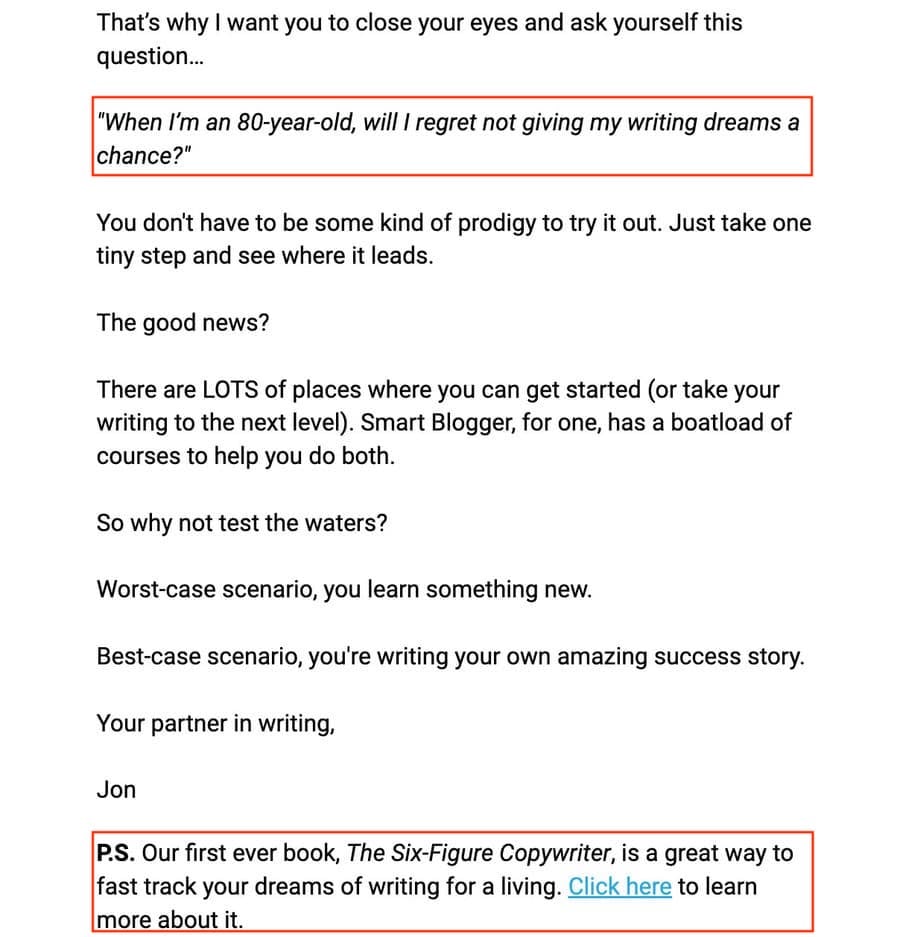
Notice how Jon has circled back to the original question:
“When I’m 80 years old, what will I regret NOT doing in my life?”
Then he followed up with an enticing CTA at the bottom of the email.
Offer Assistance or Further Information
Lastly, let your recipients know that you’re there to help if they need anything.
This shows that you’re not just a faceless sender, but a real person who cares about their needs.
For example, a simple, “If you have any questions, please don’t hesitate to reach out,” works wonders.
Show Appreciation for Your Recipient’s Time and Attention
Before signing off, consider acknowledging the time and effort your recipient is putting into reading and responding to your email.
This simple gesture can go a long way in building goodwill and fostering a positive relationship.
Why not add:
“Thank you for taking the time to consider my proposal.”
Step 5. Leave a Lasting Impression with Your Sign-off

Finally, it’s time to put the cherry on top: your sign-off and signature.
It’s your last chance to leave a positive impression and provide your recipients with your contact information.
Choose an Appropriate Sign-Off
Just like your greeting, your sign-off should strike the right balance between professionalism and warmth.
For a more formal email, try “Sincerely,” while “Best regards,” works well for less formal situations.
Or, create your very own. Did you notice Jon’s in the previous example?
“Your partner in writing,”
Include Your Details
Don’t leave your recipients guessing who you are or how to get in touch with you.
Include your full name, title, and contact information, so they have everything they need at their fingertips.
For example:
Jane Smith,
Job Title
Company Name
Phone: (555) 123-4567
Business Email: jane.smith@companyname.com
Add a Professional Headshot
Including a small, professional headshot in your email signature can help personalize your message and put a face to your name.
This humanizes your communication and makes it easier for recipients to connect with you.
Now that you’ve mastered the five crucial steps let’s take a moment to explore some tools and resources that can further enhance your email creation process.
Leverage Powerful Tools and Resources

Elevate your email game by utilizing various tools, resources, or an email client designed to streamline your communication.
Explore free tools like Grammarly for grammatical errors, Canva for designing eye-catching visuals, and Mailchimp for managing your email marketing campaigns or if you’re after an email template.
Armed with these powerful resources, you’ll be creating masterful emails that leave a lasting impression on your recipients, all while saving time and effort.
Having explored these valuable tools, let’s wrap up with a reminder of the importance of the skills you’ve acquired.
Master This Email Format and Make a Lasting Impression
And there you have it: a well-crafted, professional email in five simple steps!
By following this outline and putting yourself in your reader’s shoes, you’ll be able to create engaging, memorable, and effective emails that get results.
Just remember to stay humble, empathize with your recipients, and keep your language clear and concise.
With a little practice, you’ll be an email format pro in no time!
So go forth, conquer those inboxes, and make every email count.





As for step #1 Sam, I finally figured out how your advice for being concise and to the point meant emailing my list the subject line:
“New Update on Blogging From Paradise”
for each update.
Why?
Clearly, concisely, the email was a new update on my blog….LOL. 🙂
Organically, my clicks jumped not through being clever, working hard or overthinking it but by being to the point.
People who want new updates, click.
Everyone wins.
Ryan